Valentine’s Cookies

Likely you know Valentine’s Day is next week? Some people look forward to the holiday while others dread it. Many of you tout it as a Hallmark holiday. Regardless of your feelings, it is here to stay, so you might as well embrace it instead of being a curmudgeon (M will continue to be a curmudgeon about it).

For several years now T has hosted Friendsentine’s Dinner. It started almost a decade ago to make sure everyone felt included on Valentine’s day, much like it was back in elementary school. Really that’s the way it should be! Celebrate all the love in your life not just the romantic one. Typically, our group of friends goes to dinner at a new or “hot” restaurant around town. This year we are headed to Public School 214. Braden and I have been before and we love their bacon cheddar tater tots! T is super excited about dinner, and she always brings a treat with her for all the guests. She had been looking for a fun treat to attach to her Llama themed valentines and went with the recipe below!

Meanwhile, M is melting down upstairs because the valentines her kids picked can no longer get here in time for Valentines day. Amazon get it together! You are supposed to be the most amazing shopping center. I guess that’s what happens when every mom in America has that Prime membership.

So now we both need valentines and/or treats. SO dun dun dunnah! Enter these delicious Valentines Cookies. This is a recipe idea adapted from a Pinterest find. This sugar cookie recipe is the one T uses for Christmas cookies. It takes NO time to chill, which is amazing. and produces great dough for cookie cutting.

So here you go! For all of your Valentine’s needs next week. PSA…be careful. T ate the entire batch…by herself, which was NOT Weight Watchers friendly!

img_1597              img_0439

Valentines Day Cookies

1 C Unsalted butter, softened

1 C granulated sugar

1 Large egg, room temperature

1 tsp. Vanilla extract

1/2 tsp almond extract

1/2 tsp Salt

2 tsp Baking Powder

3 C all purpose Flour

Pink Gel Food Coloring (or red or purple!)

Step 1: Preheat your oven to 350 degrees. Using your mixer, beat the butter and sugar until combined. Mixture should be light and fluffy!

img_1600               img_1606

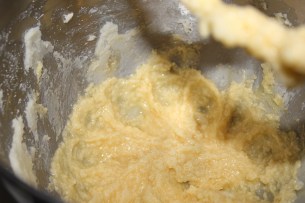
Step 2: Beat the egg, vanilla, and almond extract into the mixture. Be sure to scrape the sides if needed to ensure all ingredients are thoroughly incorporated. In a separate bowl combine the salt, baking powder, and flour.

Step 3: While mixing, gradually add your flour mixture a little bit at a time until flour is fully combined. (*I usually dump about 1/2 c. at a time)

img_1607

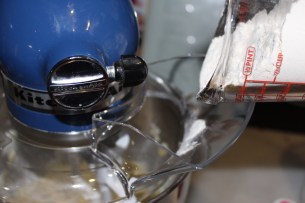
Step 4: Gather your dough into a ball. Break off half of it and set aside in a bowl. Leave the other half in the mixer. Add your gel food coloring. YOU DON’T NEED MUCH. Add a few drops at a time and mix until fully combined. Add additional drops as needed to get your desired color. (Keep in mind that the final product will be slightly lighter than the color of the dough, so you might go a little darker than you think you need).

img_1610              img_1612

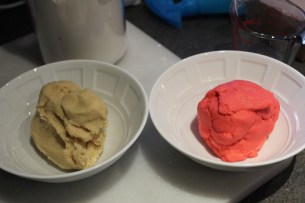
Step 5: Make alternating balls of dough on your work space. Once all the dough is out. Gently knead the balls together to mix the color. DO NOT OVER KNEAD! T definitely over kneaded and got more pink than swirl cookies.

img_1613              img_1614

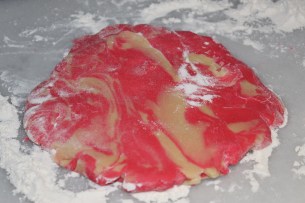
Step 6: Line your cookie sheet with parchment paper. On your workspace roll out the dough to your desired thickness (1/4″ typically works the best). Cut out your shapes and place them on the tray.

img_1616           img_1618

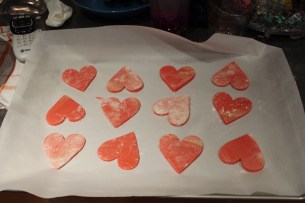
Step 7: Bake for 6-8 minutes and enjoy!!! (M says how do you know if it’s 6 or 8 minutes? Well, that’s really hard to say because everyone’s oven cooks slightly differently. You can usually tell by the smell. But the cookie itself should looked cooked and not gooey. If you give the pan a little shake nothing should jiggle. T doesn’t like to wait for the edges to brown because it can detract from the cookie if you aren’t icing it. She advises you start checking at 6 minutes and take out when the cookies appear cooked through and are no longer shiny from the moisture in the batter.)

img_1630

This was a great, super easy, recipe that produces absolutely stunning cookies. You don’t need to add anything to it but you could sprinkle with sugar crystals to give them a little oomph.

Happy Eating!

xoxo, T&M

P.S. did you know that if you store cookies with a piece of bread they stay fresher longer? Who knew!

P.P.S. You can even ADD bread to the cookie container once the cookies have gone a little hard and it will soften them right up. Amazing!


Pasta with Broccoli & Italian Sausage

T has a few staple meals that are go tos when she is tired or does not feel like making a complicated meal. Bonus points if the recipe is easy enough for her husband to help, or even do it for her if she’s running late.

It can be tricky to find meals that take little time and virtually no effort, but they can be found! This gem we’re posting about today is a dish T designed by combining elements from several different pasta dishes. Caution: It is a little spicy, but can be modified to reduce that.

T feels like pasta has gotten a bad rap these days because nobody wants carbs. LOL jk. Everybody wants carbs, but avoids them because they aren’t diet friendly. #disagree Pasta can be your friend and it’s filling! This particular recipe is great because you can fill it with vegetables and meat, get a little pasta to satisfy that craving, and not walk away feeling weighed down.

img_1369

Today’s recipe includes broccoli, spicy italian sausage, red pepper flakes, Parmesan and the basics. Ways to modify:

Meats: sub chicken breast, shrimp, or tofu (for M)

                                    Vegetables: sub or add, broccolini, brussel sprouts, zucchini, spinach

Add ins: pine nuts, panko bread crumbs,

This dish is super user friendly, so you can adjust the ingredients to fit your particular tastes or cravings. For instance, I will often use a splash of garlic infused olive oil, which gives you a little garlic flavor without the chunks of garlic that make your breath smell bad. 🙂

img_1394

Pasta with Broccoli & Italian Sausage

4 Tbsp. Salt

1 box of pasta (orecchiette is T’s fav)

1/4 C. + 2 Tbsp Olive Oil (divided)

1 Head of Broccoli (or bag of frozen broccoli)

1/2 – 1 Lb. Spicy Italian Sausage

1 Tbsp. Red Pepper Flakes

1 tsp. Black Pepper

1/3 C. Parmesan

Step 1: Bring a pot of water to a boil. Add in the salt. Then add the pasta and cook until al dente.

img_1378      img_1374

Step 2: While the pasta is cooking, use one tablespoon of your olive oil and saute your broccoli on low-medium heat until tender (3-5 minutes). When done move broccoli to a bowl.

Step 3: Use the 2nd tablespoon of olive oil and the same pan as the broccoli. Cook the sausage on medium heat until browned. Use a spatula to break your sausage into desired chunks. Once browned, return the broccoli to the pan and continue to cook on low until sausage is cooked through (5-7 minutes).

img_1384         img_1388

Step 4: When Pasta is done, drain the pasta and return it to the pan. Pour in the remaining 1/4 C. of olive oil and add the spices. mix until well combined. Then add your vegetables and sausage to the pan. Mix.

img_1389       img_1391

Step 5: Add the Parmesan either directly into the pan, or scoop the pasta into serving dish and top with the Parmesan.

img_1396

This meal takes no more than 30 minutes, and is delicious!

Happy Cooking,

xoxo

T&M


Homemade Applesauce

As an adult applesauce doesn’t seem like a go too snack. Now that there are kids involved we wonder why that is? Applesauce tastes even better now than it did as a kid. You get a serving a fruit and a little sugar. It’s perfect for anytime you have a little sweet tooth going! P.S.A. it also tastes amazing served warm over ice cream. Don’t knock it till you try it!

So you don’t like applesauce? Consider making it just to make your house smell like fall. I didn’t even want to turn off my crock pot because I didn’t want to make the smell go away. We still have a few weeks before we start switching scents to fir trees, fire and snow! Take advantage of it!! But you also don’t have to limit this recipe to the fall. It’s good all year long 🙂

If none of that convinced you let’s talk about how easy it is. There is literally zero excuse for not trying this. A recipe doesn’t get any easier than this. SO TRY IT. If you don’t have a crock pot go buy one. We will talk to you about why this tool is essential in another post, but bottom line is you can do literally anything in that thing.

Oh and p.s…… this recipe is only a whopping 1 weight watcher point per serving!!

Cinnamon Applesauce

8 apples*
2 3in. cinnamon sticks
  2 Tbsp. Ground Cinnamon
5 tsp. light brown sugar
 
*Any type. I like to use a combination of Honey crisp and Granny Smith. Getting two flavors of apples gives you a more robust flavor.
Step 1: Peel, core and chop the apples. To peel it use a vegetable peeler (if you’re lucky you can do it in one long string). Then slice around the core to get 4 large chunks.
Step 2: Toss them in the crock pot and add the rest of the ingredients
Step 3: Set your crock pot to low and cook for 6 hours.

Step 4: Optional. blend your mixture if you want it super smooth or just use a whisk to stir and eat it chunky! I then put it in old jars like a pasta sauce jar or a salsa jar that’s been thoroughly rinsed out.
AND YOU’RE DONE! Congrats on making the bestest, easiest recipe EVER! Don’t be afraid to play with the proportions (adding things or taking things away to get the flavor YOU want) Let me know how it goes!
xoxo T